Steller Apiaries in Jackson, Michigan hosts horizontal top bar hive (HTBH, aka Kenyan top bar hive) building workshops the first Saturday of the month February through April, and my sister and I attended the March workshop.
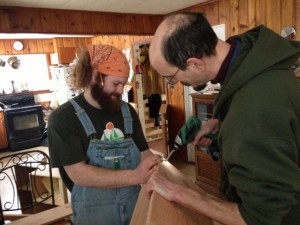 We’d already taken Steller’s introductory course on HTBH beekeeping and put deposits down on starter nuc colonies from Steller, so we were anxious to get our first hives built.
Keith and Jessica Steller are both very friendly and knowledgeable, and are a great resource for alternative beekeepers in southern Michigan.
During the workshop, we assembled two standard (36″) hives of Steller’s design. We opted for the upgraded copper roof option for both hives, as this finish is extremely attractive.
Steller has been keeping honeybees since 2007, and began using top bar hives after having some overwintering failures in Langstroth hives. They have become very active proponents of HTBH beekeeping at local and statewide levels.
Many of their colonies come from local captured swarms and feral colonies they remove and relocate from buildings and other unwanted places. Steller has had good success in transferring feral colonies to HTBHs, and feral bees provide good “survivor” genetics that should be pest-resistant and well-adapted to the local climate. Steller brings in some package bees from New York and California to start new colonies, as well.
 Steller’s Hive Design
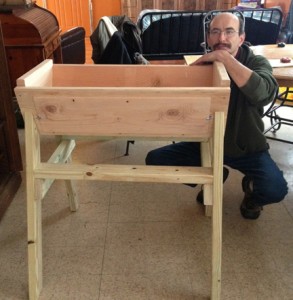
Before the workshop, I did quite a bit of reading and research on HTBH beekeeping and alternative hive design. Steller has a unique, well-built HTBH designed based on their experience keeping bees in Michigan’s cold winter climate.
Steller’s current standard HTBH body can be built from a single 12 foot long 2″ x 12″ board (which is actually 1 1/2″ thick). The thicker boards provide added insulation during winter. The follower board is made from 1 x 12″ (actual 3/4″) lumber.
Top bars are 17 1/4″ long and 1 3/8 inches wide (not fully reaching the outside edges of the sides of the hives.) Steller does not use spacers between bars, and uses top bars with a very shallow bevel (10 degrees) as a comb guide. Compared to a steeper angle used in many other top bar designs, they feel the shallow angle matches the angle bees natural work at. An advantage of a shallower bevel is that less burr comb is used to attach combs to the bars, so more useful honey comb space is available to the bees on each bar.
Overall hive length was reduced to 36″ from 48″ when Steller found that colonies generally would not fill 36″ worth of hive space in a season. Steller also uses smaller nucleus hives sized for 6-8 top bars.
Steller’s HTBH is very sturdy and easy to put together. The hive’s bottom board is 32 5/8″ long, fits inside the hive, and is angled like the hive sides so that it cannot fall out of the bottom of the hive. They currently do not use a screened bottom, but have built custom hives with screen bottoms and wood covers. The advantage of a screened bottom is that it helps monitor and reduce varroa mite populations in the colony. Genetic resistance has come a long way in improving bees’ resistance to mite pests through hygienic behavior, including grooming.
Most HTBHs have an entrance in one of the long sides, but Steller takes a unique approach for hive entrances, utilizing a bottom entrance at one end. Steller previously used an entrance at the bottom of one of the hive ends, but have found an entrance in the bottom board reduces problems with mice. The entrance is 3/8″ wide and the entire width of the bottom board. They also believe that the bottom entrance helps make the hive easier for bees to clean and allows them to defecate during winter without leaving the hive and being exposed to cold weather.
Wood choice
An advantage of HTBH hives is that they can be constructed from a variety of materials. Wood does not need to be high grade or free of knots and imperfections, and scrap wood is perfectly suitable. Nor do the joints have to be perfectly tight, as bees will use propolis to close off and tighten up the hive as needed.
In mild winter climates, 1″ thick (actual 3/4″) boards are fine to use, as additional winter insulation is not necessary.
Wood is hydroscopic (moisture absorbing), particularly in humid climates. This characteristic helps a hive to absorb moisture produced by bees during respiration. Wood also dries as it ages, and positioning wood so that the rings in the boards are toward the inside of the hive helps prevent bowing and reduction of hive strength as wood ages.
The hives we built are from pine, which needs treating to promote longevity. Only the outside of the hive is treated. Exterior grade latex or oil based paint can be used, or the hives can be treated with linseed oil. Linseed oil requires annual re-treating for 5-6 years, until the hive wood is thoroughly saturated, and is an excellent treatment as long as it is maintained. Melted beeswax can also be used, requiring a single treatment (though this requires a lot of beeswax).
Hemlock, cedar, and cypress can be used in hive building without treatment, as they are naturally rot resistant. Steller does not like cedar for hive bodies, as they believe its strong scent may affect the ability of a colony to communicate via pheromones. (Note that rough cut cedar which is fully propolized by the colony may not be an issue, as The Warré Store in northwest Michigan has had good success with rough cut cedar Warré hives.)
Steller uses poplar for top bars. It is a softer hardwood and is very porous, so it helps to further absorb moisture.
 Observation Window
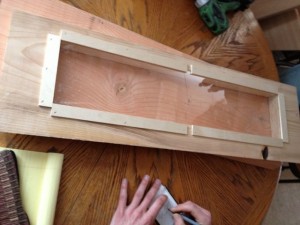
Steller uses plexiglass 28″ long by 6″ wide for observation windows.
The window is somewhat loosely fitted and held in place with thin plywood braces. Too tight a connection and the window can bow and even break. The window requires a slight cutting down of the follower board.
 The window cover is 1 1/2″ thick, with a 1″ lip to provide a good light seal.
Creating the cutouts for the window and cover requires the use of a jig saw and a router.
The window cover is held in place with two metal screen latches attached with pan head screws. The latches are attached tightly at first, 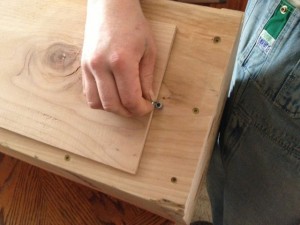 and may need some adjustment over time to keep the cover held securely.
Construction
The hive is held together with star head (torx) or square head 2 1/2″ exterior screws. Holes are pre-drilled and counter sunk for the screws, creating a recession for the screw head. Sides are attached to the end boards with 3 screws, with holes drilled 3/4″ in (to hit the center of the end board), about 1 1/2″ from top and bottom of side, and in the center.
The angle of the hive sides determines the depth of the hive and length of the top bars. Standardizing on a hive design allows top bars to easily be moved between hives for combining hives or doing splits.
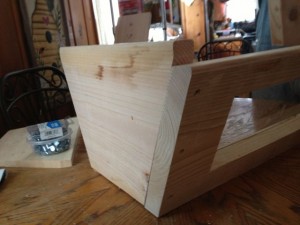 HTBH plans vary in the angle that they use for the sides of the hive. (See the Beekeeping Page for extensive links on alternative hive design and construction.)
The Peace Corps recommends a 120 degree angle from the bottom of the hive sides, while some other authors recommend 25 degrees from the top. Steller uses a 21 degree angle, which starts 1″ down from the tops of each end board.
Follower Board
Steller uses follower boards built from 1 x 12″ lumber (thus, 3/4″ thick) which are 16 1/4″ wide and 9 1/4″ tall, cut with the same 21 degree angle as the ends. Steller does not use a top bar above the follower board, as some plans call for. This makes it very to see exactly where the follower board is located in the hive.
 Legs
Legs
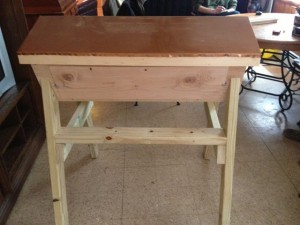
Steller uses an interesting sawhorse design for hive legs.
Legs are constructed from pressure treated 2x4s. Untreated cedar can also be used.
The design is quite secure, regardless of the weight of the hive.
 Roof
Roof
Steller uses a peaked roof, to ensure good ventilation in summer and to allow putting in insulation in the winter. Roofs should ideally be given a more thorough protection than just painting, for maximum longevity. Shingles, tar paper, rubber, or metal can be used. Steller offers a very attractive copper plated roof option (plated aluminum with a finish to prevent the copper from discoloring).
Setting up a new hive
A starter nuc or package bees can be used to start a new top bar hive. (Note that nuc colonies in Langstroth frames do not fit into a top bar hive.) I plan to use both methods this season, and package bees have been ordered from Wolf Creek Apiaries.
In preparing for bee installation, Steller uses a swarm attractant they make to use for treating new hives. It is made of beeswax, lemongrass oil, a small amount of propolis, and mineral oil. This is all they recommend for treating the inside of a new hive, and they do not use empty comb when starting a new hive, to avoid potentially passing on pathogens to the new hive.
Feeding the new hive can be done with a jar feeder or ziplock bag feeder behind the follower board. See my Beekeeping Page for more information on feeding new colonies.
Additional Hive Construction
I will be building several more top bar hives based on Steller’s design for use in Northwestern Michigan. I’m going to skip observation windows in the additional hives I build, to reduce cost and simplify construction.
I’ll primarily be using 1 x scrap wood that I have available. I plan to build one longer hive (approx 44″, spaced to allow 3 follower boards), to house two colonies in a single hive as described in Les Crowder and Heather Harrell’s excellent book Top Bar Beekeeping: Organic Practices for Honeybee Health. Though based on their New Mexico climate, I have found the management systems detailed in this book extremely interesting.
This style efficiently houses two hives, may help maintain hive temperature in winter, allows several options for making splits from the two hives in summer, and would require only minor modification to the Steller design (slightly longer sides, additional follower boards, a second entrance in the bottom board, and more top bars).
I will almost certainly buy top bars from Steller, which they sell for $1 each, until I learn the nuances of efficiently making their 10 degree cuts.
