As livestock is an important component of sustainable farm design, I felt it important to establish livestock at Two Fish Farms this spring. Honeybees seemed the ideal choice, as larger animals require investment in fencing for pasture and outbuildings for winter protection, as well as more regular daily maintenance than honey bees.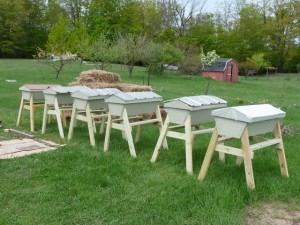
This spring, I’ve been constructing horizontal top bar hives (HTBHs) for the farm as I’ve had free time.
I invested in two packages of bees, and the farm invested in another three packages of bees. Packages are being sourced from Wolf Creek Apiaries and are expected this week.
Shipped package bees are not foolproof to establish, so I also have an established micro top bar colony from Steller Apiaries ready to pick up. Starting a new hive from an established nuclear (nuc) colony is much more foolproof than establishing package bees, as a nuc is a functioning colony working with a queen, not an assortment of bees from multiple hives and a newly mated queen without a bonded colony
We quickly began joking about “bee fever”, as a nearby farm, Five Springs Farm, also wanted to invest in a package of bees — so I offered to build their hive. Another neighbor requested a hive, after seeing the copper roofed Stellar workshop hive. And I also supplied my sister with cut wood for a 2nd hive.
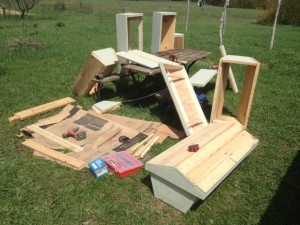 After several weeks of rummaging through scrap lumber provided by friends (especially Jan, thanks!), cutting, drilling, cursing, gluing, screwing, unscrewing, rescrewing, and painting, I have 5 newly built HTBHs, plus an additional high-end hive (with copper plated roof and observation window) built at a Steller Apiaries workshop. And parts ready to assemble for another hive. Plus enough pieces for another half a hive or so.
I learned a great deal about HTBH construction in the construction process. I used the Steller Apiaries design, with some modifications based on the scrap wood I had access to.
Out of pocket expenses were just under $50 per hive. Primarily costs were purchased top bars from Steller and pressure treated 2x4s for legs. This cost also includes paint, wood glue, and a recessed drill bit to pre-drill screws, and a tube of weatherproof cauk. I had all the screws needed on hand from previous projects. All lumber, other than pressure treated 2x4s for legs, was sourced from wood scrap. Roof covering material was also sourced from scrap.
Assuming the proper tools are available, HTBHs are easy and inexpensive to build, and give homeowners and small farmers a good way to enter into beekeeping without a lot of investment. Creative use of scrap wood is the key to inexpensive hive construction.
My carpentry skills are best described as rough, as they were learned from my father, who taught himself remodeling in working on the (overly) numerous homes we lived in when I was growing up.
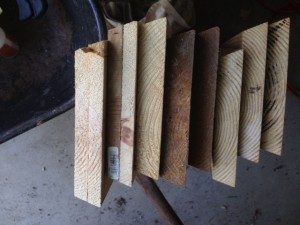
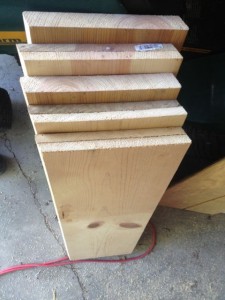
I used a combination of 2″ and 1″ lumber. Nominal 1″ boards can be glued together to create 2″ nominal boards. Nominal 2″ boards that aren’t wide enough can potentially be glued together for end and side pieces. I used a combination of techniques across the hives.
For side boards, you potentially can skip gluing, and just screw each side piece to each end. I tried (and mostly succeeded) in ensuring that the growth rings point the same way on all glued boads. The goal is to have the rings pointing toward the inside of the hive, to maximize the strength of the hive.
Whenever I screwed into the ends of 1″ lumber glued to 2″, I made sure to use two screws instead of one — one in each board — for added strength.
The main difference in the hives I built from the Steller is in roof construction. Steller uses 3/8″ plywood for its roofs. I used primarily 1x4s for the roof, instead of plywood, which I would have had to purchase. This adds some weight to the roof overall, but not an excessive amount. I also skipped the support board under the 1x4s for two of the roofs. This was an oversight on my part, as I had actually cut the pieces, but did not install them. Oops. I do not believe that this in any way reduces the strength of the roofs made from 1x4s.
One roof was covered with scrap wood siding, and one with 3/4″ plywood scrap. The siding roof was a bit tricky, as it was just 36″ wide and needed some additional 1×2 supports to anchor the edges down securely, as the hive roof exterior is 38″ long. I had some cracking of support boards, but some wood glue, a strong clamp, and some additional screws made the roof sturdy.
In addition, I chose to cut the long side (and central) supports of the roofs at the same 21 degree angle as the short sides, due to using 1×4 lumber ripped to width. This allowed the roofing boards to lay flat on the side support.
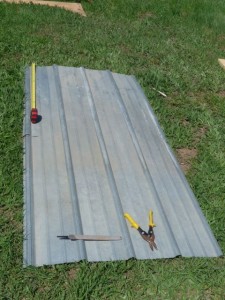 Roof covering material was scavenged from some metal roofing at Two Fish Farms. One hive, the 44 1/4″ long, two colony hive (there is an entrance at each end, and an additional follower board to separate the colonies) has its roof covered with two layers of 4 mil poly, stapled to the undersides of the roof. I plan a special covering on top of this hive in the future, and will share the details. Tar paper is another option for covering roofs. The hive I constructed at the workshop has a lovely copper plated aluminum roof which is quite attractive, though fairly expensive.
Power tools used were: circular saw, table saw, radial arm saw, drill, chop saw, and an impact driver. Hand tools: hammer, awl, tape measure (measure twice, cut once!), tin snips for cutting metal roofing, file (for the edges of cut metal roofing — it can be extremely sharp!), clamps of various sizes (used when gluing wood pieces together), and paintbrushes (3″ and 1″). The impact driver was extremely helpful in screwing pieces together, particularly as I rarely had a helper to hold boards in the proper place. If regular drills are used, it would be good to have one set up to drill the recessed holes and another to do the screwing, to avoid having to swap bits back and forth.
I don’t currently have access to a good shop location, so I did wood cutting and assembly in multiple places. A radial arm saw is great for cutting angles in legs and cutting boards to length — though a steady hand could do it with a jig saw or circular saw, especially if a guide board is clamped down to guide the cut.
A table saw is essential for making the 21 degree angles on side and bottom boards. The chop saw was decent for cutting legs — other than I had to eyeball a 55 degree angle, as it only went to 45 degrees. I could cut at 55 degrees on my radial arm saw, but only by putting the board behind the rip stop board, which was a bit awkward. Be extremely careful with power tools, particularly when being creative with cutting.
One issue I ran into was some of the scrap 2x10s I used for bottom boards was the lumber not actually being the correct nominal width, but narrower. (Admittedly, I could have messed up cuts, but I measured several uncut boards in the pile — and some were indeed 1/4″ or more under the usual nominal width.) This lead to a few bottom board fit issues, but nothing too difficult to overcome. I glued an additional 1×12 to the top of the bottom board of the large hive, then recut the board to 21 degrees. The bottom board now fits, though it sits low and is extremely heavy. The Stellar workshop’s bottom board fits flush.
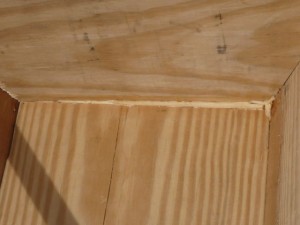
In the worst bottom boards, I used some wood glue, sawdust, and wood splints to fill gaps at the non-entrance end. Honestly, I suspect my carpentry skills are half the blame, and the odd wood the other half. As I said, my skills are rough at best.
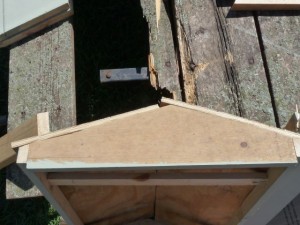
The “oops” roof, with non-centered end cuts. If cuts are about equally off on each side, the roof will work out. Adjust roof top piece size, as needed.
Bottom line: these hives are not hard to build. I purposefully used some rather poorly cut roof pieces, rather than cutting new ones, to see how crude carpentry can be on the hives. I really had no problems working things out with the poorly cut pieces.
What would I do differently?
- Assemble the first hive before cutting the rest of the wood, to ensure everything is fitting properly.
- Set up both table and radial arm saw so that I could have a board guide at 36″+ — mine only go out to about 24″ currently. Housing these tools in an area wide enough to handle 12′ to 20′ long boards would also have been helpful, as some of the boards I used were quite long.
- Wear gloves the whole time I’m working, to reduce splinters (I got many).
- I might reduce the length of the horizontal brace connecting the sets of legs. The 32″ length is designed for hives with observation windows, so it could be shorter for hives without windows (all the hives I built from scratch are windowless).
Hives are placed in the new apiary, scented with swarm attractant (Steller makes one from beeswax, lemongrass oil, propolis, and mineral oil), and waiting for bees. I’ve got 2:1 sugar solution (sugar:water, weight based) ready for feeding the new colonies. A 2:1 sugar solution can be made by dissolving a 4 lb. bag of white sugar (cane or beet) in 5 cups of hot water. One bag with 5 cups of water is just over 1/2 a gallon of solution, which is just more than fits into a beer growler.
 Next up, after the bees are successfully established in hives, is to work on planting the “royal gardens” — getting good nectar and pollen plants established on the property. As much of the pasture is spotted knapweed (Centaurea maculosa, aka spotted knapweed or star thistle), we should have a strong natural season nectar flow. Effort will be focused on early and late season blooming species, to extend and enhance the forage season for the bees, as well as planting additional primary season species.
I’ll be making a post on establishing package bees and nuc colonies in full sized HTBHs soon. Let bee fever spread!

